Saturday, March 16, 2013

How to Install Windows 7 or 8 from USB Flash Drive

The biggest advantage of installing Windows using USB flash drive is speed: It installs Windows just about 15 minutes approximately. Moreover, traditional optical disks (DVDs) get damaged upon use and time, so there is no surety whether it will successfully install Windows on your PC or not. USB flash drive gives you great ease and guarantee!
To install Windows 7 or 8 from USB flash drive, you will require:
1) A USB flash drive with 4 GB or more storage capacity.
2) Windows 7 or Windows 8 installation files.


Follow these simple steps to install Windows from a USB drive:
1. Insert the USB flash drive to your computer. Copy any important data from flash drive to your PC.
2. Open Command Prompt with administrator rights- for which either you may type cmd in Start menu search box and hit Ctrl+ Shift+ Enter or Go to Start menu > All programs > Accessories, right click on Command Prompt and select Run as administrator.
3. Type ‘DISKPART‘ and hit enter. You’ll see DISKPART> prompt on screen.
4. Type ‘LIST DISK‘ and you’ll have a list of disks in your PC. Look for the disk number of your USB flash drive. Let’s assume that your disk drive number is ‘Disk 1′. ’Disk 0′ might be your hard drive. If you have Disk 2 as your USB flash drive then use Disk 2.


5. Type below commands one by one:
SELECT DISK 1
CLEAN
CREATE PARTITION PRIMARY
SELECT PARTITION 1
ACTIVE
FORMAT FS=NTFS
(Formatting may take a few seconds)
ASSIGN
EXIT
6. Now, still in Command prompt, locate ‘boot‘ folder in your Windows installation folder you have on your hard disk or DVD drive.
For example, assume that your Windows installation files are located at folder D:\Windows7 in your hard disk, type the following commands:
D:\
CD Windows7
CD boot
7. Type following command:
BOOTSECT.EXE /NT60 K:
Here, K:, for example, is your USB drive letter. You’ll see below message:

8. Finally, copy your Windows 7 or Windows 8 installation files to the USB flash drive.
9. Your USB drive is ready to boot and install Windows 7 or 8. Only thing you now need to change the boot priority at the BIOS to USB from the HDD or DVD drive. I think no explanation is required for this as it’s just the matter of changing the boot priority or enabling the USB boot option in the BIOS.
If you are still not able to boot after following this guide, this only means that you haven’t set the BIOS priority to USB.
All the pics belongs to their owners.

All-Time Essential, Free Software Downloads For Your Windows PC

Here is a list of most recommended and all-time essential software downloads for your Windows PC. Especially when you are having a fresh Windows computer, you will find this guide helpful and it will serve as a check-list to install programs. Be assured that all the links and download locations are of official publishers and are safe to download.
Software download

Antivirus

Avast Free Antivirus: The most popular antivirus for any Windows version.
AVG Antivirus: A good alternative to Avast.
Malwarebytes’ Anti-Malware: Will save you from malwares which your antivirus could not.

System Tools and Utilities

CCleaner: Automatically clean up all history and temporary files and get a fresh feel on your Windows PC.
Advanced System-Care: Check your Windows computer for problems/errors and fix them automatically.
WinRAR: Compress and decompress files, this program supports all types of formats.
Orion File Recovery Software: Recover and undelete lost files from your computer’s hard-drive, USB flash drive or memory card. Free of charge.
DriverMax: No more searching for rare drivers! Automatically check for missing drivers or driver updates for your computers and install them.
Nero BurnLite: Do not want to spend on Nero Express? Here is the free, basic version of Nero CD/DVD burning software.

Multimedia

VLC Media Player: World’s best ever and most popular media player which supports almost all types of sound and video formats.
Any Video Converter: Powerful free program to convert any video format to any format, supports all kinds of formats including those used in Apple and Android devices!
Virtual DJ: You just need your computer and an MP3 playlist to become like a professional DJ!

Communication

Skype: The most popular video and voice calling software.
TeamViewer: The best program to remotely handle a computer easily with full controls, or hold a virtual meeting with multiple participants.

Documents

Foxit Reader: Best, fast and free PDF reader software.
PDF To Word Converter: Convert PDF files to Microsoft Word format, free utility.
PDF Creator: Freely and easily create PDF files.
Notepad++: A popular file editor which provides you the features which Windows Notepad is missing like editing multiple files in tabs, searching through files. It is also useful for software and html writers, because it shows different text colors depending on programming language.
Apache OpenOffice.org: If you do not want to spend on Microsoft Office, this suite, supporting Microsoft Office (Word, Excel and PowerPoint) documents, will serve as a good alternative.

Education and Learning

TypingTest: The best software available so far to learn typing. Recommended to learn fast operating of computer for ease and save your time.

Development Tools

IIS: It is recommended to install Microsoft Internet Information Services from your Windows installation DVD. If downloading, make sure to check for compatible IIS version with Windows version you have.
SQL Server Management Studio Express: A free, easy-to-use graphical management tool for managing SQL Server Express Edition. Check for compatible version before downloading.
JAVA Runtime Environment: JRE provides the libraries and other components to run applets and applications written in the Java on popular browsers.
Microsoft .Net: .Net is essential to run programs written in Microsoft.Net. Though it already comes installed with latest Windows version, you can also download its latest version easily.

Friday, March 8, 2013

How to Speed Up Windows 7 or 8 for Best Performance

Microsoft has already optimized Windows 7 for speed and great performance. In fact, they’ve made Windows 7 for speed. Still, you can use some tricks to further speed up Windows 7 and get best out of it.


1. Turn off Unwanted Windows 7 Features

  • Open “Programs and Features” from Control Panel.
  • Click “Turn Windows features on or off ” from the left pane.
  • Unselect all the Features that you don’t use in Windows 7 and restart the computer for the changes to take effect.
There can be many feature in windows 7 that we often don’t use. Disabling these unused features in Windows 7 certainly helps in speeding up.

2. Disable the Unneeded Visual Effects

  • Right click on “Computer” and select “Properties”.
  • Click “Advanced System Settings” from the left pane to open”System Properties”.
  • Select the “Advanced” tab. Then under “Performance”, click “Settings”. Choose “Custom” Options From it.
  • Now unselect all the options and select only the last three or four options which seem useful and necessary.
  • Now just logoff Windows 7 and re-login.
Even though we have tuned off the Aero effects in Windows 7 still there are many unwanted visual effects that can be safely disabled to speed up windows 7 even more. You will now definitely notice the significant improvement in speed.

3. Disable the Aero Theme

  • Right Click on your Desktop and select “Personalize” click the Window Color Tab.
  • Unselect the Box saying “Enable Transparency” and then click on” Open classic appearance properties for more color options”.
  • Then a window will open up. Apply a Standard or Basic theme from it. The Standard Windows 7 theme is more preferred.
The aero user interface certainly is a good feature in Windows 7 but certainly is a resource hog especially when, what you expect from windows 7 is more performance. Aero user interface squeezes your graphics or video card to its maximum. So if we care more about speed and performance in Windows 7,  disabling the Aero will certainly add an extra speed boost to it. You can check this by looking into the memory consumption when Aero is turned on and off.

4. Disable the Aero Peek and Aero Snap features

  • Open the Windows 7 “Control Panel” and double-click on “Ease of Access Center” icon.
  • Now click on the “Make it easier to focus on tasks” seen at the bottom in there
  • Now untick the check box saying “Prevent windows from being automatically arranged when moved to the edge of the screen” .
  • Right click on the Windows 7 Taskbar and select “Properties”.
  • Now untick the “Use Aero Peek to preview the desktop” option from there.
Aero Snap helps you to maximize, minimize and resize the windows just by dragging and dropping it into the screen corners. The Aero Peek feature in Windows 7 helps you to peek through all open windows by hiding all other windows and showing only the outlines of all windows. Aero Peek is similar to the “Show Desktop” Feature in XP and Vista. If you have followed step 3 then Aero Peek will be automatically disabled.

5. Disable Screen Savers and Wallpapers

  • Right click on desktop and choose “Personalize”.
  • Click the Screen Saver link ” From the Screen Saver drop down menu, Set it to “None” and click “Apply” and then “OK”.
  • Now click on “Desktop Background” link.
  • From the “Location” drop down menu select “Solid Colors” and pick one color and click “OK”.
In order to display the wallpaper and screen saver the system needs some memory. So by disabling those two we can save a few Mega Bytes of memory.

6. Disable the Unwanted Services

There are many services in windows 7 that we dont require for our daily use. There are some exceptional cases though. Services such as “print spooler” is only needed when we use a printer. If we use a printer only occasionally we can safely turn off that service in Windows 7 and turn it on only when we need to take a print. Disabling the unneeded services in Windows 7 can really speed up the system boot time.

7.  Set Up the Windows 7 Ready Boost Service

  • To configure the Ready Boost Feature in Windows 7 you need to have a High Speed Flash/USB or Pendrive with you which is ready boost compatible.
  • After plugging your USB drive, open “Computer” > Right-click the on USB Drive > select “Ready Boost” tab > tick the “Use this device” check-box.
  • You can configure how much space on your USB drive/ Pendrive to be used as RAM.
The ready boost feature in Windows 7 will help you to use your flash drive or pendrive or USB drive as Ram there by improving the performance and speed of windows 7 greatly. You can certainly experience it when launching bulky applications such as Adobe Photoshop etc.

8. Disable the Gadgets (Windows 7 Sidebar)

  • Right click on the sidebar and select “Properties”.
  • On the properties windows untick the check box showing “Start sidebar when Windows Starts”
  • From now on windows sidebar won’t start when windows 7 start up.
  • Disabling the window 7 sidebar is definitely help you to to gain a few seconds during start up time. There are many useful utilities such as the RocketDock etc. which are good application launchers.

9.  Disable the Thumbnail Preview for Fast Folder/File browsing

  • Double Click on “Computer” > click on the “Organize” drop-down menu and select the “Folder and Search options”
  • Under ‘Files and Folders’ section, go to the “View” tab and tick the check box showing “Always show icons, never thumbnails” check-box.
The thumbnail preview feature in Windows 7 will show the small thumbnails of the contents of a folder instead of showing it’s icon. But this feature really do take up some system resources. So by disabling the Thumbnail Preview feature in Windows 7 the file browsing in Windows 7 explorer can be speed up.
In order to maintain your Windows 7 Performance and keep it up in Top Shape there are some very essential software’s that can help us to Speed Windows 7. I will list some of them here. You can download these utilities. But i remind you that you need to run these utilities at least once in a week. Only if you do it regularly your Windows 7 will be in top shape every day.

10. Disable Unnecessary Start Up Items to Speed Up Windows 7 Start Up

  • Type “msconfig” in the “RUN” option from start menu press [Enter] to open up the System Configuration Utility.
  • Now navigate to the “StartUp” tab.
  • Untick the Entries which are not needed
This really matters when you have installed a lot of softwares on your PC. Many software will run services such as device detector etc. during the system start up. These are of no use actually for most windows users. So preventing such services from starting up during the start up of windows 7 can result in quicker start Ups. This will actually save some seconds during windows 7 start up.

11. Change the Power Plan To Maximum Performance

  • Double click the “Power Options” in the Control panel.
  • Click the down arrow showing “Show Additional Plans” to see the “High Performance” power plan.
  • Now just activate the “High Performance” plan and that’s it.
  • You may go for the advanced settings for further tweaking if you want.
The Power settings in Windows 7 is not automatically set for maximum performance. By default the power plan in Windows 7 is set for a balanced performance with energy consumption on hardware. So you may not get the optimal performance from windows 7 if this is the case. So we need to change the power plan to High Performance Mode.

12. Disable the Search Indexing

  • Right Click the “Computer” Icon in the desktop and select “Manage”.
  • Click “Services and Applications” in the “Computer Management” window.
  • Click on “Services”.
  • You can see a lot of services listed there. Look for “Windows Search” in that.
  • Right Click on “Windows Search” from the list and choose “Properties”.
  • The “Windows Search Properties Window” will open up. From “Startup type” click on the drop down menu and choose “Disabled”.
  • Click “Apply” then “OK” and that’s it. The Windows 7 Search Indexing Feature is now disabled.
Most of the Windows 7 users do less searches in there system. The Search Indexing service in Windows 7 will index keeps track of the files so that they can be found quickly when asked at some other time. This feature is useful only if you perform frequent searches on your system.
For occasional file searchers the Search Indexing service in Windows 7 is a total resource hog. It unknowingly eats up your system resources. What you need from windows 7 is maximum performance from it then i would certainly recommend you to disable this resource hogging Windows 7 Search Indexing Feature.
If you want to completely disable the search indexing feature in Windows 7 you can set the Search Indexing Service to Manual (See the above method about disabling unwanted services).

13. Disable Unwanted System Sounds in Windows 7

  • Type mmsys.cpl in RUN From the Windows 7 Startmenu search box and press [Enter].
  • Navigate to the “Sounds” tab.
  • Now from under “Sound Scheme:” select “No Sounds” > Click “Apply” > “OK”.
  • You can keep some of your favorite sounds turned on if you want, but sounds played during the Windows 7 start up, shutdown, Logon, logoff, start navigation etc should be set to none if you want some real speed boost.
In order to play the sounds you hear in windows 7, system resources are being utilized. So if you can disable these sound effects you can gain some speed and also free some system resources too.
 Following all these steps will certainly boost the speed and performance of your windows 7 significantly.

Wednesday, March 6, 2013

Windows hidden Tricks

Speak message trick
speakvbs This is the trick with notepad you can do. But remember you need Speaker or Headphone for this trick.

Let’s start open a notepad file. And write this:-

Dim message, sapi
message=InputBox("What do you want me to say?","Speak to Me")
Set sapi=CreateObject("sapi.spvoice")
sapi.Speak message


Save this file with name “Speak.vbs”
And now open it and write something in it and hit Enter. speak to me


Yes you can also shutdown your computer with the help of notepad just follow these steps.
Step 1: Open notepad and write the following.
@echo off
msg * I am tired.
shutdown -c “So, Bye Bye” –s
Step 2: Save the file as shutdown.bat
Step 3: Now open the file shutdown and your computer will shut down on its after showing the message in it.

How to make HD images easily

Do you know how to create HD images in photoshop?If not,then you are on the right place.......... You just need HDR Efex pro and photoshop for this. 
Let us begin.....

First of all,you need to download and Install HDR Efex Pro.HDR Efex pro is photoshop plugin.Once you installed the HDR Efex now come to photoshop.
Open the image which you want to make in HD in photoshop.
This is the original pic on which I will be working on.


After loading an image, go to Filter>Nik software>HDR Efex pro.


After clicking on HDR Efex pro,you will see this......


Now you can find Preset and Custom on left side.Select Preset>Preset categories>Landscape.In Landscape,choose 21 Gradual Contrasts.....


Now use the following global settings:-


And then click on OK.
This is the result which u will get to see.


all the images in this post belongs to their respective owners.


Tuesday, March 5, 2013

100 Very Useful Websites

Most of the sites in this compiled list of useful websites are helpful at least one or more way, with simple web addresses you can easily remember and save your time searching on Google.

Click Here to Download This List to Your Computer
If the PDF file opens in your browser, click Control+S to save the file to your computer.


1. alertful.com – setup email reminders for important events.
2. aviary.com/myna – online audio editor to record and remix audio clips online.
3. bing.com/images – automatically find perfectly-sized wallpapers for mobiles.
4. bounceapp.com – capture full length screenshots of web pages.
5. boxoh.com – track the status of any shipment on Google Maps – alternative.
6. bubbl.us – create mind-maps, brainstorm ideas in the browser.
7. builtwith.com – find the technology stack of any website.
8. wobzip.org – unzip your compressed files online.
9. copypastecharacter.com – copy special characters that aren’t on your keyboard.
10. coralcdn.org – if a site is down due to heavy traffic, try accessing it through coral CDN.
11. ctrlq.org/html-mail – send rich-text mails anonymously to anyone.
12. ctrql.org – a search engine for RSS feeds.
13. dabbleboard.com – your virtual whiteboard.
14. deadurl.com – when your bookmarked web pages are deleted, you’ll need this.
15. disposablewebpage.com – create a temporary web page that will self-destruct.
16. downforeveryoneorjustme.com – find if a website is offline or not.
17. e.ggtimer.com – a simple online timer for your daily needs.
18. encrypted.google.com – prevent your ISP (or boss!) from reading your search queries.
19. everytimezone.com – a less confusing view of the world time zones.
20. ewhois.com – find the other websites of a person with reverse Analytics lookup.
21. faxzero.com – send an online fax for free – see more fax services.
22. feedmyinbox.com – get RSS feeds as an email newsletter.
23. fiverr.com – hire people to do little things for $5!
24. flightstats.com – Track flight status at airports worldwide.
25. followupthen.com – setup quick reminders via email itself.
26. formspring.meyou can ask or answer personal questions here.
27. ge.tt – quickly send a file to someone, they can even preview it before downloading.
28. goo.gl – shorten long URLs and convert URLs into QR codes.
29. google.com/history – found something on Google but can’t remember it now?
30. google.com/webfonts – a good collection of open source fonts.
31. gtmetrix.com – the perfect tool for measuring your site performance online.
32. homestyler.comdesign from scratch or re-model your home in 3D.
33. iconfinder.com – the best place to find icons of all sizes.
34. ifttt.com – create a connection between all your online accounts.
35. imo.im – chat with your buddies on Skype, Facebook, Google Talk, etc. from one place.
36. iwantmyname.com – helps you search domains across all TLDs.
37. join.me – share you screen with anyone over the web.
38. joliprint.com – re-format news articles and blog content as a newspaper.
39. jotti.org – scan any suspicious file or email attachment for viruses.
40. kuler.adobe.com – get color ideas, also extract colors from photographs.
41. livestream.com – broadcast events live over the web, including your desktop screen.
42. lmgtfy.com – if you are too lazy to use Google on your own.
43. lovelycharts.com – create flowcharts, network diagrams, sitemaps, etc.
44. mailvu.com – send video emails to anyone using your web cam.
45. marker.to – easily highlight the important parts of a web page for sharing.
46. midomi.com – when you need to find the name of a song.
47. minutes.io – quickly capture effective notes during meetings.
48. mixlr.com – broadcast live audio over the web.
49. myfonts.com/WhatTheFont – quickly determine the font name from an image.
50. noteflight.com – print music sheets, write your own music online (review).

51. notes.io – the easiest way to write short text notes in the browser.
52. office.com – download templates, clip-art and images for your Office documents.
53. onlineocr.net – recognize text from scanned PDFs – see other OCR tools.
54. otixo.com – easily manage your online files on Dropbox, Google Docs, etc.
55. pancake.io – create a free and simple website using your Dropbox account.
56. pastebin.com – a temporary online clipboard for your text and code snippets.
57. pdfescape.com – lets you can quickly edit PDFs in the browser itself.
58. pipebytes.com – transfer files of any size without uploading to a third-party server.
59. polishmywriting.com – check your writing for spelling or grammatical errors.
60. postpost.com – a better search engine for twitter.
61. printwhatyoulike.com – print web pages without the clutter.
62. privnote.com – create text notes that will self-destruct after being read.
63. qClock.com – find the local time of a city using a Google Map.
64. radbox.me – bookmark online videos and watch them later (review).
65. random.org – pick random numbers, flip coins, and more.
66. regex.info – find data hidden in your photographs – see more EXIF tools.
67. safeweb.norton.com – check the trust level of any website.
68. scr.im – share you email address online without worrying about spam.
69. screenr.com – record movies of your desktop and send them straight to YouTube.
70. scribblemaps.com – create custom Google Maps easily.
71. seatguru.com – consult this site before choosing a seat for your next flight.
72. similarsites.com – discover new sites that are similar to what you like already.
73. sizeasy.com – visualize and compare the size of any product.
74. snopes.com – find if that email offer you received is real or just another scam.
75. spypig.com – now get read receipts for your email.
76. stupeflix.com – make a movie out of your images, audio and video clips.
77. sumopaint.com – an excellent layer-based online image editor.
78. sxc.hu – download stock images absolutely free.
79. tagmydoc.com – add QR codes to your documents and presentations (review).
80. talltweets.com – Send tweets longer than 140 characters.
81. teuxdeux.com – a beautiful to-do app that looks like your paper dairy.
82. timerime.com – create timelines with audio, video and images.
83. tinychat.com – setup a private chat room in micro-seconds.
84. translate.google.com – translate web pages, PDFs and Office documents.
85. tubemogul.com – simultaneously upload videos to YouTube and other video sites.
86. typewith.me – work on the same document with multiple people.
87. typingweb.com – master touch-typing with these practice sessions.
88. untiny.me – find the original URLs that’s hiding behind a short URLs.
89. urbandictionary.com – find definitions of slangs and informal words.
90. viewer.zoho.com – Preview PDFs and Presentations directly in the browser.
91. virustotal.com – scan any suspicious file or email attachment for viruses.
92. wetransfer.com – for sharing really big files online.
93. whichdateworks.com – planning an event? find a date that works for all.
94. whoishostingthis.com – find the web host of any website.
95. wolframalpha.com – gets answers directly without searching – see more wolfram tips.
96. woorank.com – research a website from the SEO perspective.
97. wordle.net – quick summarize long pieces of text with tag clouds.
98. youtube.com/disco – quickly create a video playlist of your favorite artist.
99. youtube.com/leanback – Watch YouTube channels in TV mode.
100. zoom.it – view very high-resolution images in your browser without scrolling.

Click Here to Download This List to Your Computer
If the PDF file opens in your browser, click Control+S to save the file to your computer.

Hate Windows 8? Cool Tips & Tricks To Make It Fun!


Made For Speed

Windows 8 is a major departure from Microsoft’s past interfaces. This is fact that Windows 8 is faster, more responsive and dramatically smoother. Applications snap open, and flipping between them is so fast. Those who have reviewed and used the operating system seem to enjoy the experience.
Here are some Windows 8 tips & tricks I found useful to make it enjoyable. And if you are using Windows 8 on a touch screen device, it will be a fun experience!

1. Overview Your Entire Start Screen By Semantic Zoom

If you’re using a touch screen, squeeze the Start screen with two fingers to receive a bird’s eye view of your entire screen contents. This is useful when you have a lots of apps/programs installed and want to see all the apps without scrolling the contents up and down.

2. Use Windows Hot Corners

The corners on your screen provides you to different Windows features. Below, is a brief explanation of each of these corners.
Bottom Left-hand corner of the screen will allow you to access the Start screen, if you’re in the Start screen and have the Desktop open, this corner will open the Desktop from the Start screen.
Quick Tip: Right-clicking in the left hand corner will open the power user menu.
Moving the mouse to the top-left corner and then down will display all the apps running on the computer. Clicking and dragging any of these apps to the left or right-hand side of the screen will snap that app to that side of the screen. Each of these open app icons can also be right-clicked to close or snap.
On the full right-hand side of the screen will be given access to the Windows Charms.

3. Why Close Buttons Are Hard To Find?

Closing a program seems easy, but you might have noticed that close buttons are hard to find in Windows 8. That’s because Microsoft encourages us to run apps in the background where they’ll take up minimal resources, but still be accessible at any time!
Still, anyway, you can close an app 1) by dragging it from top to bottom, or 2) using Alt+F4 keys or 3) using the task manager.

4. Find Anything Using Power-packed Search

Search looks power-packed. Start typing anything you are looking for in the search bar and it will search in the apps, files/folders and emails too.

5. Windows 8 God Mode Folder?

Create a magic folder which contains all the Windows 8 setings and hidden tweaks:
1. Create a “New Folder” by right-clicking on empty spot in any directory, preferably Desktop.
2. Give the folder this name: All Settings .{ED7BA470-8E54-465E-825C-99712043E01C}
3. Open the folder to see a complete list of settings.
But be careful for using advanced settings, don’t change them unless you are an expert.

6. PC Slowed Down? Get Fresh Windows 8 Easily in Minutes!

In Windows 7 and previous versions, you had to format and reinstall the entire OS to get a fresh feel. This was a tiresome and time-wasting process. Windows 8 provides an in-built way to refresh your computer!
In order to perform the Windows 8 refresh, go to Settings and click the Change PC Settings tab near the bottom. Select the General tab and find the “Refresh your PC without affecting your files” section near the middle (you may also select “Remove everything and reinstall Windows” to get the true factory settings treatment). Select “Get started” and press “Refresh.” After a few minutes the PC will restart, and you will have a fresh copy of Windows 8.

7. Shut Down Shortcut:

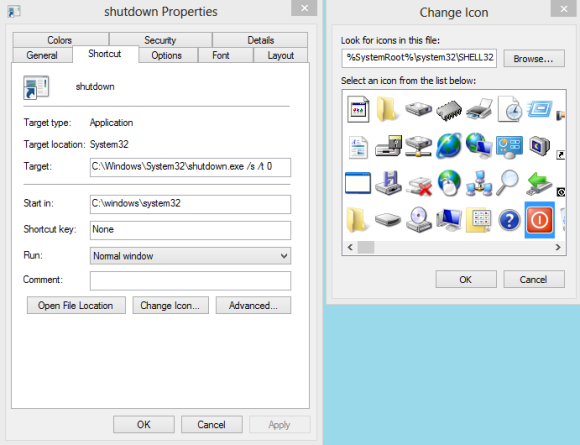
Windows 8 hides the Power button in the Settings menu, so it takes multistep process just to shut down your PC. But you can pin a Shutdown button right onto the bottom of your desktop using following trick:
Windows 8 shutdown with one click
Create a shortcut on your desktop (right-click, go to New, then Shortcut). Enter “shutdown /s /t 0″ (with no quotes, and, yes, that’s a zero not an “O”) as the location of the item, and press Next. Now name the shortcut (prefereably “Shutdown”) and press Finish.
Right-click the shortcut, and navigate to Properties. Choose Change Icon in the Shortcut tab, and then OK to leave the warning box. Choose an icon of your choice from the list. In the screenshot above, you’ll see we chose a Power button.
Right-click the shortcut again, and select Pin to Start. You can place the icon on your Start screen wherever it’s convenient. Clicking it will instantly shut down your computer.
But which one is the easiest and fastest way to shutdown? Hit power button on your computer!

8. Classic Start Menu

This is the thing many people keep missing on Windows 8. If you want to anyway want the Start menu on Windows 8,
ViStart, a free utility will do a good job.

9. Fun Way To Password-protect

Windows 8 enables you to create a picture password, where you choose an image, then draw on it in a combination of taps, lines and circles – only someone who can reproduce this pattern will be able to log on. Select Win + I > More PC Settings > Users > Create a Picture Password to give this a try.

10. Mount ISO files in Windows 8

Right-click it in Explorer, click Mount and you can view it as a virtual drive, launch the files it contains, or add more if you like.

11. Windows 8 Recovery Options

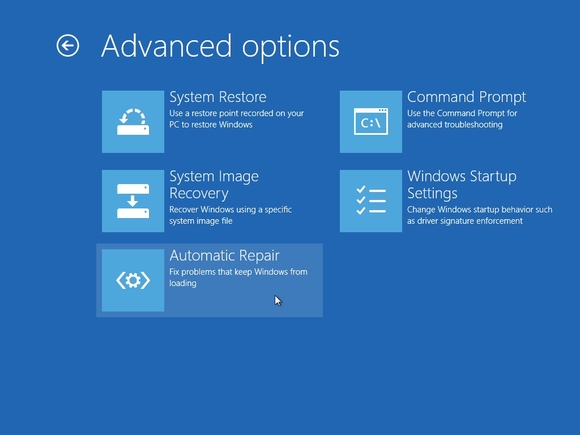
Windows 8 provides useful, advanced options to recover when a disaster occurs.
Windows 8 Advanced Recovery

12. Most Useful Hotkeys

Here is a list of hotkeys to make your Windows 8 experience even a fun:
Win : switch between the Start screen and the last-running Windows 8 app
Win + C : displays the Charms: the Settings, Devices, Share and Search options
Win + D : launches the desktop
Win + E : launches Explorer
Win + F : opens the File Search pane
Win + H : opens the Share pane
Win + I : opens Settings
Win + K : opens the Devices pane
Win + L : locks your PC
Win + M : minimises the current Explorer or Internet Explorer window (works in the full-screen IE, too)
Win + O : toggles device orientation lock on and off
Win + P : switch your display to a second display or projector
Win + Q : open the App Search pane
Win + R : opens the Run box
Win + U : open the Ease of Access Centre
Win + V : cycle through toasts (notifications)
Win + W : search your system settings (type POWER for links to all power-related options, say)
Win + X : displays a text menu of useful Windows tools and applets
Win + Z : displays the right-click context menu when in a full-screen app
Win + + : launch Magnifier and zoom in
Win + – : zoom out
Win + , : Aero peek at the desktop
Win + Enter : launch Narrator
Win + PgUp : move the current screen to the left-hand monitor
Win + PgDn : move the current screen to the right-hand monitor
Win + PrtSc : capture the current screen and save it to your Pictures folder
Win + Tab : switch between running apps
On Tablet:
To take a screenshot on a Windows 8 tablet, simultaneously press the Windows button and the volume-down button on the tablet chassis.

7 Most Useful Google Chrome Tips & Tricks

Chrome tips and tricks

Do you know that Google Chrome is now the world’s most popular browser? According to WikiMedia statistics, 37% of internet users on computers use Chrome, defeating Internet Explorer at 26% and Firefox at 23%. Chrome was first publicly released for Microsoft Windows OS on December 11, 2008 and became world’s most widely used browser in 4 years.
Google Chrome Logo
Chrome’s logo which was updated on March 2011. Credits: Google
Interestingly, Google’s co-founders Sergey Brin and Larry Page had hired several Mozilla Firefox developers and built a demonstration of Chrome! Chrome is also released for other platforms like Apple’s iOS, OS X, Linux and Android.

Fast, Modern and Secure

Comparing with other browsers, Chrome’s interface is minimalistic, which makes it a truly modern web browser.  Application performance and speed in JavaScript processing is one of its strengths.
Chrome also aims to be secure. It periodically retrieves updates of two blacklists for Phishing and Malware, so it warns you when you try to visit a harmful site.
If you are using Chrome, I would like to share some useful Google Chrome tips & tricks.

1. Omnibox Tricks

Why do they call Chrome’s address bar as Omnibox? Omnibox is intelligent! You normally use Omnibox for typing website URL, but you can also use it for many other purposes like below. Many of them will seem like Google search.

a) Calculator:

Just type in a formula like 383 + 4813)/ 3^3 * 312, and it will show you the result. For square root, try usingsqrt().
You can also get sin(), cos(), tan(), log() etc. values immediately. Type 5! = to get factorial value of 5.

b) Unit conversion:

Type “1 miles in meters” and it will give you the answer. You can also use numbers of conversions like distance, currency, time, temprature, and so on.

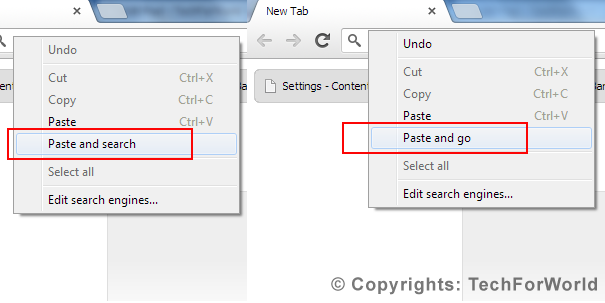
c) Paste and Go/Paste and Search:

Right clicking on the Omnibar will allow you to directly go to the website or search after pasting the text, depending what (website URL or search keyword) you have in the clipboard.
Chrome omnibar paste feature
Omnibar’s “paste” feature

2. Pin Websites

Use this feature if you use several websites frequently. To pin a web address, right click on the tab title bar and click ‘Pin’. Now, second time when you open the Chrome, all the the pinned websites will open automatically.

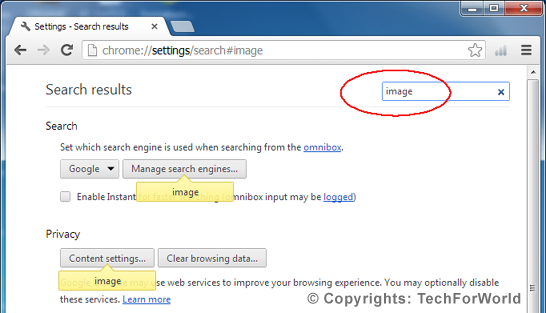
3. Search for Settings

Trying to find a setting but could not find? Click on Options button on top right corner and open “Settings”. Type in any setting you are looking from in the search textbox on the top right corner.
Search feature in Chrome settings
Search feature in Chrome settings.

4. Chrome Commands

Just type in any of the following commands in the Omnibox and hit Enter key:
chrome://plugins See list of all the plugins installed on Chrome
chrome://bookmarks List all your bookmarks
chrome://downloads List all downloads
chrome://settings Open chrome settings
chrome://version Know about currently installed version of Chrome on your PC
chrome://history See browsing history
chrome://chrome-urls Get a list of all the Chrome commands like above
For quick access, you can also bookmark (add to favorite) any of above commands like any other URL.

5. Chrome Task Manager

Access Chrome’s task manager by clicking options button (top right corner) -> Tools -> Task Manager. Alternative you can press Shift+ESC key.
Using Task Manager, you can know about running tasks, websites and extensions on Chrome. It will also list how much memory (RAM of your computer) each one is using. You can also quickly close any task using it.

6. Icognito Mode

This is a useful feature for your privacy and security of your data. Press Control+Shift+N key to open Chrome in Icognito mode. Websites you view in Icognito mode will not appear in your browser history or search history, and they will not leave other traces, like cookies, on your computer after you close all open incognito windows.

7. Most Useful Short-cut Keys:

Ctrl + K Move the cursor to the Omnibox (address bar)
Ctrl + [Click on a link] Open the link in a new tab
Ctrl + T Open a new tab
Ctrl + Shift + T Re-open the last tab you closed
Ctrl + N Open new Chrome window
Ctrl + Shift + N Open Icognito mode
Ctrl + F4 Close current tab
Ctrl + Tab Navigate to next tab
Ctrl + Shift + Tab Navigate to previous tab
Ctrl + 1-8 Pressing Ctrl and any number 1 through 8 will move to the corresponding tab in your tab bar.
Ctrl + 9 Switch to the last tab
Spacebar Scroll down the page
Home Go to top of the page
End Go to end of the page
Ctrl + H Show history
Ctrl + Shift + Delete Clear browsing history
Ctrl + J Open Downloads window
F11 Switch full screen mode on and off
Ctrl + F Find in current page
Ctrl + G Find next match in the page
Ctrl + + Zoom on the page
Ctrl + - Zoom out the page
Ctrl + 0 Reset zoom to normal
Ctrl + D Bookmark page
Ctrl + S Save the page to your computer
Ctrl + F5 F5 refreshes the page, but pressing Ctrl + F5 will reload the page overriding the cache
Ctrl + U View source of the current page
Ctrl + Shift + I Open developer’s tools interface

What is Java technology and why do I need it?

What is Java?


Java is a programming language and computing platform first released by Sun Microsystems in 1995. It is the underlying technology that powers state-of-the-art programs including utilities, games, and business applications. Java runs on more than 850 million personal computers worldwide, and on billions of devices worldwide, including mobile and TV devices.

Why do I need Java?
There are lots of applications and websites that won't work unless you have Java installed, and more are created every day. Java is fast, secure, and reliable. From laptops to datacenters, game consoles to scientific supercomputers, cell phones to the Internet, Java is everywhere!
Is Java free to download?
Yes, Java is free to download. Get the latest version at http://java.com.
If you are building an embedded or consumer device and would like to include Java, please contact Oracle for more information on including Java in your device.
Why should I upgrade to the latest Java version?
The latest Java version contains important enhancements to improve performance, stability and security of the Java applications that run on your machine. Installing this free update will ensure that your Java applications continue to run safely and efficiently.

MORE TECHNICAL INFORMATION

Originally called OAK, it was renamed as the Java programming language in 1995.
What will I get when I download Java software?
The Java Runtime Environment (JRE) is what you get when you download Java software. The JRE consists of the Java Virtual Machine (JVM), Java platform core classes, and supporting Java platform libraries. The JRE is the runtime portion of Java software, which is all you need to run it in your Web browser. When you download Java software, you only get what you need - no spyware, and no viruses.
What is Java Plug-in software?
The Java Plug-in software is a component of the Java Runtime Environment (JRE). The JRE allows applets written in the Java programming language to run inside various browsers. The Java Plug-in software is not a standalone program and cannot be installed separately.
I've heard the terms Java Virtual Machine and JVM. Is this Java software?
The Java Virtual Machine is only one aspect of Java software that is involved in web interaction. The Java Virtual Machine is built right into your Java software download, and helps run Java applications.

Monday, March 4, 2013

How Do Web Search Engines Work

Search engines are the key to finding specific information on the vast expanse of the World Wide Web. Without sophisticated search engines, it would be virtually impossible to locate anything on the Web without knowing a specific URL. But do you know how search engines work? And do you know what makes some search engines more effective than others?

When people use the term search engine in relation to the Web, they are usually referring to the actual search forms that searches through databases of HTML documents, initially gathered by a robot.
There are basically three types of search engines: Those that are powered by robots (called crawlers; ants or spiders) and those that are powered by human submissions; and those that are a hybrid of the two.

Crawler-based search engines are those that use automated software agents (called crawlers) that visit a Web site, read the information on the actual site, read the site's meta tags and also follow the links that the site connects to performing indexing on all linked Web sites as well. The crawler returns all that information back to a central depository, where the data is indexed. The crawler will periodically return to the sites to check for any information that has changed. The frequency with which this happens is determined by the administrators of the search engine.

Human-powered search engines rely on humans to submit information that is subsequently indexed and catalogued. Only information that is submitted is put into the index.

In both cases, when you query a search engine to locate information, you're actually searching through the index that the search engine has created —you are not actually searching the Web. These indices are giant databases of information that is collected and stored and subsequently searched. This explains why sometimes a search on a commercial search engine, such as Yahoo! or Google, will return results that are, in fact, dead links. Since the search results are based on the index, if the index hasn't been updated since a Web page became invalid the search engine treats the page as still an active link even though it no longer is. It will remain that way until the index is updated.

So why will the same search on different search engines produce different results? Part of the answer to that question is because not all indices are going to be exactly the same. It depends on what the spiders find or what the humans submitted. But more important, not every search engine uses the same algorithm to search through the indices. The algorithm is what the search engines use to determine the relevance of the information in the index to what the user is searching for.
One of the elements that a search engine algorithm scans for is the frequency and location of keywords on a Web page. Those with higher frequency are typically considered more relevant. But search engine technology is becoming sophisticated in its attempt to discourage what is known as keyword stuffing, or spamdexing.

Another common element that algorithms analyze is the way that pages link to other pages in the Web. By analyzing how pages link to each other, an engine can both determine what a page is about (if the keywords of the linked pages are similar to the keywords on the original page) and whether that page is considered "important" and deserving of a boost in ranking. Just as the technology is becoming increasingly sophisticated to ignore keyword stuffing, it is also becoming more savvy to Web masters who build artificial links into their sites in order to build an artificial ranking.

Did You Know...
The first tool for searching the Internet, created in 1990, was called "Archie". It downloaded directory listings of all files located on public anonymous FTP servers; creating a searchable database of filenames. A year later "Gopher" was created. It indexed plain text documents. "Veronica" and "Jughead" came along to search Gopher's index systems. The first actual Web search engine was developed by Matthew Gray in 1993 and was called "Wandex".

Tips to Diagnose and Fix a Slow Running Computer

Follow the below mentioned tips to fix a slow running computer:
 1) The first thing you should do is to save any open files and quit any applications that are running. Try rebooting your computer to see if that is a quick fix — there really are a lot of users out there who leave their systems running as close to 24/7 as they can, and this could lead to your system slowing down.
 2) Make sure your Windows operating system and virus scanner are both up-to-date. To check this from Internet Explorer, click Tools along the top menu, then select Windows Update. Most anti-virus programs will also have an auto-updater or an update-on-demand function that will enable you to download and install the most recent updates for the software.
 3) You should also consider any recent changes that have been made to your system immediately before you noticed the slow down issues starting. This includes things such as new hardware or software being installed. For software, double check that your computer system, including hard drive space, memory, video requirements, operating system and so on, meet the software manufacturer's minimum system requirements.
 4) Minimum System requirements can be found on the side or back of the box the software came in (or a sticker on the CD/DVD jewel case). If you find a problem here, uninstall the culprit software, reboot the computer and see if this solves the slowness problem.
5) For newly added hardware (such as a printer, scanner or other device), the easiest way to check and see if it is the cause is to simply remove the device. Reboot the system and check your system performance without the device installed. You should also check on the manufacturer's Web site to see if they have released newer drivers than what you are using.
6) If you haven't made any recent system changes and a reboot doesn't do the trick, you can also verify that your system simply isn't running out of resources. Make sure that your hard disk hasn't filled up without you noticing, and that your system has adequate video and system memory (RAM) resources for the tasks you are trying to do. This is probably a good time to do some basic Windows maintenance tasks, such as cleaning out temporary files, defragging your hard drive, and also uninstalling unused programs.
7) It's also a good idea to check what you have running in your startup programs. Many programs may launch on startup through default settings when you install an application. Over time these applications add up and they may be draining your system resources. To see what programs are currently running on start-up, in Windows XP or Vista click on Start, select Run, then type MSCONFIG  and hit the Enter key. Select the Startup tab from the dialog box. Here you can deselect any items that are running that you don't actually need when you first start your computer up. Select Apply after deselecting the startup applications and reboot the system to check for noticeable speed gain when it restarts again.
If you've made it this far and you haven't found the problem, it's time to ensure your system is free of viruses and pop-ups. This type of malicious code is almost always installed unknowingly by the user and they can definitely be a resource hog if on your system. With an up-to-date virus scanner and/or pop-up scanner you can verify if this is the cause of your slowing system.

What's Inside a Hard Drive?

All hard drives share a basic structure and are composed of the same physical features. However, not all hard drives perform the same way — the quality of the parts inside the hard drive will affect its performance. Following is a description of the common features of the hard drive and how each part works in relation to the others. Hard drives are extremely sensitive equipment and the internal workings of a hard drive should not be handled by anyone other than an experienced professional.
The Platters

The platters are the actual disks inside the drive that store the magnetized data. Traditionally platters are made of a light aluminum alloy and coated with a magnetizable material such as a ferrite compound that is applied in liquid form and spun evenly across the platter or thin metal film plating that is applied to the platter through electroplating, the same way that chrome is produced. Newer technology uses glass and/or ceramic platters because they can be made thinner and also because they are more efficient at resisting heat.

The magnetic layer on the platters has tiny domains of magnetization that are oriented to store information that is transferred through the read/write heads. Most drives have at least two platters, and the larger the storage capacity of the drive, the more platters there are. Each platter is magnetized on each side, so a drive with 2 platters has 4 sides to store data.

The Spindle and Spindle Motor

The platters in a drive are separated by disk spacers and are clamped to a rotating spindle that turns all the platters in unison. The spindle motor is built right into the spindle or mounted directly below it and spins the platters at a constant set rate ranging from 3,600 to 7,200 RPM. The motor is attached to a feedback loop to ensure that it spins at precisely the speed it is supposed to.

The Read/Write Heads

The read/write heads read and write data to the platters. There is typically one head per platter side, and each head is attached to a single actuator shaft so that all the heads move in unison. When one head is over a track, all the other heads are at the same location over their respective surfaces. Typically, only one of the heads is active at a time, i.e., reading or writing data. When not in use, the heads rest on the stationary platters, but when in motion the spinning of the platters create air pressure that lifts the heads off the platters. The space between the platter and the head is so minute that even one dust particle or a fingerprint could disable the spin. This necessitates that hard drive assembly be done in a clean room. When the platters cease spinning the heads come to rest, or park, at a predetermined position on the heads, called the landing zone.

The Head Actuator

All the heads are attached to a single head actuator, or actuator arm, that moves the heads around the platters. Older hard drives used a stepper motor actuator, which moved the heads based on a motor reacting to stepper pulses. Each pulse moved the actuator over the platters in predefined steps. Stepper motor actuators are not used in modern drives because they are prone to alignment problems and are highly sensitive to heat. Modern hard drives use a voice coil actuator, which controls the movement of a coil toward or away from a permanent magnet based on the amount of current flowing through it. This guidance system is called a servo.
The platters, spindle, spindle motor, head actuator and the read/write heads are all contained in a chamber called the head disk assembly (HDA). Outside of the HDA is the logic board that controls the movements of the internal parts and controls the movement of data into and out of the drive.

Sunday, March 3, 2013

What You Need to Know About Motherboards

How a motherboard works inside your computer

The main circuit board inside your computer is called a motherboard. The motherboard contains the connectors for attaching additional boards, such as the CPU, BIOS, memory, mass storage interfaces, serial and parallel ports, expansion slots and all the controllers that are required to control standard peripheral devices such as the display screen, keyboard, and hard drive. Collectively, all these chips that reside on the motherboard are known as the motherboard's chipset.


You can think of the motherboard as a communications center. The purpose of the motherboard is to provide the means for all the other components and peripherals to talk to each other.  You may be able to upgrade to a faster PC by replacing the CPU chip (processor) or improve performance by adding RAM (memory).
There are different types of motherboards depending on the type of CPU is was deigned to use. Motherboards are divided into categories based on what type of socket it has. Socket 478, for example, is used for Intel Pentium 4 and the Celeron series CPUs. Socket 939 is used for the AMD64 range of processors. It's important to ensure any motherboard you buy will support the type of CPU you want to use in the system. If you already have a CPU you'll need to purchase a motherboard that will accept that same processor. For those building or upgrading a system, you can also invest in a motherboard & CPU combo, which is often cheaper than buying the two components separately and it also ensures compatibility.
It's important to remember that all of the system components must be supported by the motherboard itself. So, if you were to upgrade your memory you can't just search online for "system memory" and buy whatever falls into your price range. You must make sure the type of memory you buy (SDRAM, DDR-SDRAM, RDRAM) and the size (512-MB, 1-GB) is supported by the motherboard.

When upgrading your system you should keep in mind that not all components of your system can be upgraded due to limitations of the motherboard. For example, an older motherboard will not support dual channel memory or PCI Express. Some upgrades that you may want to make may mean upgrading to a new motherboard first.

How to Clean Common Computer Parts and Devices

The best way to have any computer component cleaned is to have it professionally serviced, but if you no longer have a service warranty, or if you picked up a second-hand item and want to clean it to see if it even works, here are some tips on how to clean some common items.

Precautions
When working around electronics there are some precautions you should always take when cleaning:
  • The best way to clean any computer component or device is to follow the manufacturer's instructions in your user manual.
  • Always power off the system first
  • Always use anti-static wristband or other professional grounding devices
  • Never work on carpeted surfaces
  • Never spray cleaning fluids directly onto computer components. Always spray the cleaner onto a cloth then wipe
  • Do not allow any cleaner to run or drip near circuit boards, or near seams on device casings.
  • Never allow circuits or electronics to become damp or wet.
  • Some cleaning solvents can damage components. In most cases, water will work just as well.
  • Cleaning electronics and circuit boards requires experience, knowledge and special electronics cleaners. This type of cleaning is best left to professionals.

Cleaning Tricks & Tips

  • If compressed air is too strong for little dust jobs, try using a plastic liquid medicine plunger style dispenser. Pull the plunger all the way back to fill it with air and then push it forward quickly for a quick output of air to blow away dust in small places such as USB ports or SD memory card slots. The small ends of these dispensers enable you to reach a more concentrated area with the air then you could get with just blowing our air yourself (from your mouth).
  • When using compressed air, always release in short blasts. Longer blasts can actually result in condensation.
  • Anti-static cloths are great for attracting dust and are safe to use around computer equipment.
  • The cleaner you keep your work space, the cleaner your equipment will be
  • Be sure to hang on to your user manuals as they provide you with the best cleaning methods for that particular device.

How to Clean That?

A Digital Camera

The lens on a digital camera should never be touched and should be cleaned only when absolutely necessary, so be sure to put that lens cap to good use. For basic dust removal, you can buy a soft lens brush or plastic air blowers which remove dust and particles without anything touching the lens that could damage it.
For cleansing stubborn dirt, invest in a microfiber cleaning cloth for gently wiping off the lens. It's very important to use a brush or blower first, then use a cloth to remove particles. For more stubborn dirt, you should use only a special fluid designed for lens cleaning. Never use paper towel or similar paper products to clean the lens as it may result in scratching.  If you are using a fluid lens cleaner, be sure to put a drop onto proper lens tissues to clean — never put the fluid directly on the lens itself. Cannon also recommends that in place of a lens cleaner you can blow gently on the lens so that moisture condenses on its surface. Use gentle lifting motions (not rubbing motions) to clean and do not press hard. Use a clean lens tissue each time you move over the surface. This will prevent any dirt that is clinging to the tissue from scratching the lens.
The outside of the camera can be wiped down using a lint-free cotton cloth, and you can also use the soft brush and blower for cleaning dust from the battery, memory card, power adapter and USB adapter slots.

CD & DVD Discs

Dirty media can cause errors or make the media not work at all. You can remove fingerprints and dirt by lightly rubbing with a clean lint-free cloth. Cotton is the best material to use. You need to wipe starting at the middle of the disc and work your way to the outer edge. Never wipe in the direction of the tracks (the lines running around the disc). If the dirt is harder to remove, like dried on liquids for example, use water or a spot of rubbing alcohol on a cotton swab to clean it. You can also purchase disc cleaning kits. Never use a general all-purpose cleaner on a disc.

Dust Inside The Case

If you want to clean the build-up of dust from inside your computer case, you must shut the system down first, and make sure you are not working on carpet or any surface which is a electricity conductor. It is recommended you ground yourself (using an electronics wristband or other professional grounding equipment and follow the procedure for your equipment). To clean dust from the components inside you will need compressed air, an anti-static cloth, a small (child size) soft paint brush, and a cleaning fluid made specifically for electronics.
Inside the case you will want to use the compressed air to clean around the fans, power supply and areas where the dust is building up. Be careful not to aim the air directly towards any circuit board or electronic components in the case. Use short blasts and arm movement to direct the falling dust outside of the case. You can use the small brush to dislodge dust in areas where the compressed air did not remove the build-up (such as the edges of fan blades). You can also use the brush to wipe dust away from the inside case walls and the wires.  If you find dust has fallen down to the bottom of your case, dampen the anti-static cloth with the electronics cleaner and wipe along the bottom of the case to remove it. You can also use the damp cloth to wipe all around the metal case of your tower and the cover.

A CRT Monitor

Monitors that are made of glass and do not have any special coatings can be cleaned using a basic glass cleaner, or water (preferred). Do not spray directly on the monitor as the liquid could run down into seams and into the electronics. Using a soft lint-free cloth cloth such as cotton, spray the cleaner onto the cloth to moisten it and gently wipe the viewable surface. You can use a computer vacuum or compressed air to remove dust from the monitor housing, paying special attention to the vents, to make sure they are free of dust. Cleaners may damage the plastic casing of your monitor, so avoid this. Use a cloth slightly moistened with water if you need on the case.

An LCD Display

LCD monitors require a different cleaning than a CRT does. LCDs are not made of glass and will have special coating on them for anti-glare. Following your manufacturer's recommendations is the best method for cleaning an LCD. If you can't obtained this information, here are a few general tips: Never use paper towel on an LCD as it can cause scratching. Instead be sure to use a soft cotton cloth. You can also purchase microfiber cleaning cloths that are designed for LCD and camera lens cleaning. If a dry cloth cannot remove the prints, you can use a special LCD cleaning liquid. Always slightly dampen the cloth and wipe, do not put any liquid directly onto the display.

A Keyboard

Keyboards that are dirty can cause some keys to stick when pressed or other malfunctions. Dirt and dust can easily be cleaned from your keyboard by periodically holding it upside down and shaking it, or blasting it with compressed air. If the keys are dirty, once you have powered off the system, you can use a damp lint-free cloth to wipe the top facings of the keys. Never spray cleaner directly onto the keys as it may drip down into the circuitry beneath.
If you spill a liquid on the keyboard, you should immediately shut down the computer (or if using a plug-and-play keyboard, unplug it from the computer). Turn the keyboard over onto a towel or cloth to prevent as much liquid from getting into the circuits as possible. You can use a small lint-free cloth to help clean the liquid out from between the keys, but do so with the keyboard still upside down. Leave the keyboard upside down for a day to help ensure as much of the liquid dries out as possible. A large amount of liquid spilled into the keyboard will usually result in the keyboard needing to be replaced, regardless of how well you try to clean it.
If you just want to freshen up the look of the keyboard (e.g. not clean due from problems or spilling of liquid) a cloth that has been moistened with warm water and a gentle soap will work quite well.

A PDA, Smartphone, Cellphone, &  Similar Displays

Many of these devices do not contain glass, and glass cleaner and paper towel should never be used. For these devices, use the same procedure for cleaning the display area as listed for LCD monitors. Use a slightly moistened (water and gently soap) soft cotton cloth to wipe the external casing on these types of devices.

Non-optical Mouse

A trackball and roller mouse will need regular cleaning.  When you begin to notice delays or jerkiness in cursor movement on the screen chances are your mouse needs a a good cleaning. To clean the mouse you will need to have a few supplies in easy reach such as cotton swabs, rubbing alcohol and a soft lint-free cloth.
With the mouse disconnected from the computer, you turn the mouse over and unlock the cover ring that holds the trackball inside.  When you turn the mouse back over, both should fall out easily (be sure to catch them with your hand — don't drop the trackball onto your desk or other surface). Both the trackball and ring can be cleaned using a soft lint-free cloth. Set the ring down and place the trackball on top of the ring to securely hold it while cleaning the rest of the mouse.
Start by blowing into the trackball holder area of the mouse to get rid of dust and loose particles. Inside you will see the rollers that hold the trackball in place. Chances are you will also see strands of dirt all the way around the rollers. Use a drop of alcohol on the cotton swap (just enough to dampen it) and use the swab to push against the dirt buildup on the roller to free it. Keep the tip of the swab against the dirt and rotate the rollers. You usually will see the dirt come off in a long piece (or several small if it breaks). You can also use your fingernail to pull the strip off instead of the cotton swab, once it has been loosened. Don't use anything sharp that could damage the rollers. Make sure you pull the gunk out of the trackball hole when it comes off the roller. You will need to repeat the process on each of the rollers inside. Leave the mouse opened to the air to ensure any wetness from the alcohol has completely dried up before replacing the trackball and cover ring.
Every time you move this type of mouse across a mouse pad it picks up dirt and dust. To help cut down on the amount of dirt buildup in the mouse, you should ensure that the surface of your mouse pad is clean and dry. Wash it frequently making sure you give it lots of drying time before using the mouse on it again.

Optical or Laser Mouse

An optical or laser mouse usually won't malfunction like a mechanical trackball mouse will, but you can still clean them for optimal performance. Wipe the bottom surface of the mouse with a clean lint-free cloth. For dust and particles over the lens area, you can use compressed air to blow it away. If you don't have compressed air you can also try just blowing air (from your mouth) in a couple quick strong spurts. If this doesn't clear the lens, you can also try a cotton swab to clean it without scratching.

USB Connectors and Ports

With USB powering so many devices, these ports get a lot of usage. Some front USB ports come with covers, which many people actually leave open because they are used so frequently. Thumb drives get left laying on desks, without the caps on and so on. Digital camera cords pick up dust then get transferred when plugged into the USB port. The list goes on. For the most part you can clean around the USB connector to remove dust and particles, simply by using compressed air or blowing inside of it. You can also wipe the plastic case area near the USB port every so often with an anti-static wipe which helps to repel dust.

Battery Contacts

There are professional battery contact cleaners available. If there is only a small buildup but enough to cause problems with enabling the battery to get a good contact you can clean the contact by rubbing them gently with a cotton swab that has been slightly dampened with alcohol. If it is a heavier buildup, you can also try rubbing gently with a pencil eraser. Just remember not to apply too much pressure when rubbing as you could damage the contacts.

Graphics File Formats

Graphics

Refers to any computer device or program that makes a computer capable of displaying and manipulating pictures. The term also refers to the images themselves.

File Format

A format for encoding information in a file. Each different type of file has a different file format. The file format specifies first whether the file is a binary or ASCII file, and second, how the information is organized.

Common Graphic & Image File Formats

Some of the most used and common graphics formats used today ate TIFF, JPEG, and GIF. The Tagged Image File Format (TIFF) is widely used in business, offices, and commercial printing environments. Initially TIFF was designed to alleviate the problems associated with fixed file formats and to eliminate the need for proprietary image file formats. In Web-based publishing, three file formats have become the widely accepted standard. Presently Internet browsers can only read JPG or GIF and PNG images, without the user installing a separate viewer or plug-in. On Web pages it is most common to find JPEG, or Joint Photographic Experts Group files used for photographic quality images. JPEG (or JPG) uses a lossy compression structure that allows users to compress the data up to 1/10 of the original size. Such high compression results in a loss of image quality, but on Web pages the images are generally small and they need the compression to produce the smaller image file sizes for downloading.
Most graphics programs will also allow the user to select a compression factor as you save a JPEG file, so you can work with the image to achieve a good balance between file size and image quality. As the compression factor gets higher, more artifacts are introduced into the image, which are blurred to make them less noticeable.

The Graphic Interchange Format, or GIF, was developed by CompuServe to show images online when 8-bit video was commonplace. GIF uses a palette of up to 256 colors, which is why it is not suited to photo quality images where 24-bit color is required. GIF is best suited to common Web graphics like buttons, logos, text boxes, borders, and small animated images where the image is designed by the graphic artists and does not need more than 256 colors. A small background image for a Web page may only contain a few colors, in which case saving the image as a GIF file will produce the optimal file size for this type of graphic, especially when the graphic uses separate solid colors rather than shading.
Another important feature of a GIF file is that you can choose to save the background of an image as transparent. If you create a simple set of icons or text boxes for a Web page, saving these as transparent GIF files would allow you to implement the graphics on a variety of Web pages, regardless of the background colors you've used on the page. Most graphics programs will allow you to select a color within the GIF file to make transparent, or start with a transparent background and build your graphic up from there.
The compression algorithm used in the GIF format is owned by Unisys, and companies that use the algorithm are supposed to license the use from Unisys. Unisys announced in 1995 that it would require people to pay licensing fees in order to use GIF. This does not mean that anyone who creates or uses a GIF image has to pay for it. Authors writing programs that output GIF images are subject to licensing fees. To this end PNG was developed as a patent-free answer to the GIF format.
PNG, or Portable Network Graphics, is the third graphics standard supported by the Web (though not supported by all browsers). PNG was developed as a patent-free answer to the GIF format but is also an improvement on the GIF technique. An image in a lossless PNG file can be 5%-25% more compressed than a GIF file of the same image. PNG builds on the idea of transparency in GIF images and allows the control of the degree of transparency, known as opacity. PNG does not support animation like GIF does.

Alphabetical Listing of Popular Graphics File Format

Animation Shop (.psp)

Paint Shop Pro animation file (Paint Shop Pro Products)

CALS Raster (.cal, .cals)

CALS files are used mainly for document imaging and only store black-and-white, 1-bit image data.

CompuServe Graphics Interchange (.gif)

Developed by CompuServe, GIF uses a palette of up to 256 colors and is a popular choice for Web site graphics.

Deluxe Paint (.lbm)

Used by Electronic Arts' Deluxe Paint package. LBM files use an IFF Bitmap header and IFF color map. As Electronic Arts progressed towards being a game developer, Deluxe Paint was abandoned.

Encapsulated Post Script (.sps, .ai, .ps)

EPS is supported by most illustration and page layout programs.

GEM Paint (.img)

The GEM image format is the saved bitmap file used by GEM Paint and Ventura Publisher

Interchange File Format (.iff)

IFFs are 8 to 24 bit indexed color graphics or 8 bit interleave audio and are used on the Classic Amiga platform. Audio IFF files usually use a .snd extension.

JPEG (.jpg, .jpe, .jpeg)

Joint Photographer's Exchange graphic (JPEG) is a compressed raster image format file. JPEGs are popular for Web-based distribution and display of photographic quality images.

JPEG 2000 (.jp2, .jc2, .j2k, .jpc, .jpx)

The JPEG-2000 image compression system has a rate-distortion advantage over the original JPEG. It allows extraction of different resolutions, pixel fidelities, regions of interest, components, and more, all from a single compressed bitstream. JPEG-2000 also has options for lossy and lossless compression.

Macintosh PICT (.pct)

Apple Macintosh Metafile supported by most Mac programs.

MacPaint (.mac)

MAC files are used in the Macintosh MacPaint application. The MAC format requires always an image width of 576 pixels and a height of 720 lines.

Microsoft Paint (.msp)

Mono bitmap format used mainly for Black-and-white drawings and clip art.

PhotoShop (.psd)

Photoshop file (Adobe Photoshop Products)

Portable Bitmap (.pbm)

Files are created by Jef Poskanzer's PBMPlus Portable Bitmap Utilities. The portable bitmap format is a lowest common denominator monochrome file format.

Portable Greymap (.pgm)

Files are created by Jef Poskanzer's PBMPlus Portable Bitmap Utilities. The portable graymap format is a lowest common denominator grayscale file format.

Portable Pixelmap (.ppm)

by Jef Poskanzer's PBMPlus Portable Bitmap Utilities. The portable pixmap format is a lowest common denominator color image file format.

RAW Graphics File Format (.raw)

A flexible basic file format for transferring files between applications and computer platforms. This format consists of a stream of bytes describing the color information in the file.

SG Image File (.rgb, .bw, .rgba, .sgi)

SG is the file extension for the Image file associated with SnapGraphix.

Sun Raster (.ras)

The Sun Raster format is the native bitmap format on the Sun UNIX platforms. It is a simple bitmap format with wide distribution as it is supported by Sun OS and many UNIX based applications.

Tagged Image File Format (.tif, .tiff)

TIFF is mainly used for exchanging documents between different applications and different computer platforms. It supports the LZW method compression for image types.

Truevision Targa (.tga)

Developed by Truevision Inc. TGA files is a file format that will support images suitable for display on Targa hardware but is supported by many applications on a wide range of platforms.

Windows Meta File (.wmf)

Graphics file format used to exchange graphics information between Microsoft Windows applications.

Windows Run-Length Encoded (RLE)

The RLE format is a variation of the Windows BMP format that offers asome image compression. In Windows it can be used to create compressed wallpaper files or to replace the opening Windows logo screen.

Windows or OS/2 Bitmap (.bmp)

Windows Bitmap file with color options of Mono, 4-bit, 8-bit, 24-bit. Compression is RLE, Huffman 1D, or uncompressed. This format is supported by Intel machines running OS/2, Microsoft Windows, Windows NT, Windows 95, and MS-DOS.

Wireless Bitmap (.wbmp, .wbm)

WBMP is WAP (Wireless Application Protocol) graphic format optimized for mobile computing devices.

Z Soft Paintbrush (.pcx)

Bitmap graphics file format, originally developed by Z-Soft for use with PC-Paintbrush. This file format is now uised and generated by many applications and scanners.